树莓派:(1)安装aria2下载机

前言

树莓派是一个微型开发板,支持windows 10和多种linux系统,例如ubuntu,archlinux,centos等等。树莓派体形小,便于携带,功耗低,特别适合长时间运行的使用场景。本篇文章将介绍用树莓派当作下载机,部署在宿舍的应用场景。

aria2

aria2是一个下载工具,支持http,bt和metalink等。windows,linux下都可以使用。

安装

  1. 安装
    1
    sudo apt-get install aria2
  2. 创建session和配置文件
    1
    2
    3
    mkdir -r /mnt/hd/aria2/config
    touch /mnt/hd/aria2/config/aria2.session
    touch /mnt/hd/aria2/config/aria2.conf
  3. 编辑aria2.conf
1
2
3
4
5
6
7
8
9
10
11
12
13
14
15
16
17
18
19
20
21
22
23
24
25
26
27
28
29
30
31
32
33
34
35
36
37
38
39
40
41
42
43
44
45
46
47
48
49
50
51
52
53
54
55
56
57
58
59
60
61
62
63
64
65
66
67
68
69
70
71
72
73
74
75
76
77
78
79
80
81
82
83
84
85
86
87
88
89
90
91
92
93
94
95
96
97
98
99
100
101
102
# 文件的保存路径(可使用绝对路径或相对路径), 默认: 当前启动位置
dir=/mnt/hd/aria2/data
#日志
log=/mnt/hd/aria2/aria2.log
log-level=error
# 启用磁盘缓存, 0为禁用缓存, 需1.16以上版本, 默认:16M
#disk-cache=32M
# 文件预分配方式, 能有效降低磁盘碎片, 默认:prealloc
# 预分配所需时间: none < falloc ? trunc < prealloc
# falloc和trunc则需要文件系统和内核支持
# NTFS建议使用falloc, EXT3/4建议trunc, MAC 下需要注释此项
file-allocation=none
# 断点续传
continue=true

## 下载连接相关 ##

# 最大同时下载任务数, 运行时可修改, 默认:5
max-concurrent-downloads=5
# 同一服务器连接数, 添加时可指定, 默认:1
max-connection-per-server=8
# 最小文件分片大小, 添加时可指定, 取值范围1M -1024M, 默认:20M
# 假定size=10M, 文件为20MiB 则使用两个来源下载; 文件为15MiB 则使用一个来源下载
min-split-size=10M
# 单个任务最大线程数, 添加时可指定, 默认:5
split=10
# 整体下载速度限制, 运行时可修改, 默认:0
#max-overall-download-limit=0
# 单个任务下载速度限制, 默认:0
#max-download-limit=0
# 整体上传速度限制, 运行时可修改, 默认:0
#max-overall-upload-limit=0
# 单个任务上传速度限制, 默认:0
#max-upload-limit=0
# 禁用IPv6, 默认:false
disable-ipv6=true

## 进度保存相关 ##

# 从会话文件中读取下载任务
input-file=/mnt/hd/aria2/config/aria2.session
# 在Aria2退出时保存`错误/未完成`的下载任务到会话文件
save-session=/mnt/hd/aria2/config/aria2.session
# 定时保存会话, 0为退出时才保存, 需1.16.1以上版本, 默认:0
#save-session-interval=60

## RPC相关设置 ##

# 启用RPC, 默认:false
enable-rpc=true
# 允许所有来源, 默认:false
rpc-allow-origin-all=true
# 允许非外部访问, 默认:false
rpc-listen-all=true
# 事件轮询方式, 取值:[epoll, kqueue, port, poll, select], 不同系统默认值不同
#event-poll=select
# RPC监听端口, 端口被占用时可以修改, 默认:6800
#rpc-listen-port=6800
# 设置的RPC授权令牌, v1.18.4新增功能, 取代 --rpc-user 和 --rpc-passwd 选项
rpc-secret=xxxxxx
# 设置的RPC访问用户名, 此选项新版已废弃, 建议改用 --rpc-secret 选项
#rpc-user=
# 设置的RPC访问密码, 此选项新版已废弃, 建议改用 --rpc-secret 选项
#rpc-passwd=

## BT/PT下载相关 ##

# 当下载的是一个种子(以.torrent结尾)时, 自动开始BT任务, 默认:true
#follow-torrent=true
# BT监听端口, 当端口被屏蔽时使用, 默认:6881-6999
listen-port=51413
# 单个种子最大连接数, 默认:55
#bt-max-peers=55
# 打开DHT功能, PT需要禁用, 默认:true
enable-dht=false
# 打开IPv6 DHT功能, PT需要禁用
#enable-dht6=false
# DHT网络监听端口, 默认:6881-6999
#dht-listen-port=6881-6999
# 本地节点查找, PT需要禁用, 默认:false
#bt-enable-lpd=false
# 种子交换, PT需要禁用, 默认:true
enable-peer-exchange=false
# 每个种子限速, 对少种的PT很有用, 默认:50K
#bt-request-peer-speed-limit=50K
# 客户端伪装, PT需要
peer-id-prefix=-TR2770-
user-agent=Transmission/2.77
# 当种子的分享率达到这个数时, 自动停止做种, 0为一直做种, 默认:1.0
seed-ratio=0
# 强制保存会话, 即使任务已经完成, 默认:false
# 较新的版本开启后会在任务完成后依然保留.aria2文件
force-save=false
# BT校验相关, 默认:true
#bt-hash-check-seed=true
# 继续之前的BT任务时, 无需再次校验, 默认:false
bt-seed-unverified=true
# 保存磁力链接元数据为种子文件(.torrent文件), 默认:false
bt-save-metadata=true

check-certificate=false
on-download-complete="rm $3.aria2"
  1. 启动脚本

    1
    touch /mnt/hd/aria2/start_aria2c.sh

    编辑start_aria2c.sh,脚本内容如下:

    1
    2
    3
    4
    5
    6
    7
    8
    9
    10
    11
    12
    13
    14
    15
    16
    17
    18
    19
    20
    21
    22
    23
    24
    25
    26
    27
    28
    29
    30
    31
    32
    33
    34
    35
    36
    37
    38
    39
    40
    41
    42
    43
    44
    45
    46
    47
    48
    49
    50
    51
    52
    53
    54
    55
    56
    #################################
    #! /bin/sh
    # /etc/init.d/aria2c
    ### BEGIN INIT INFO
    # Provides: aria2c
    # Required-Start: $network $local_fs $remote_fs
    # Required-Stop: $network $local_fs $remote_fs
    # Default-Start: 2 3 4 5
    # Default-Stop: 0 1 6
    # Short-Description: aria2c RPC init script.
    # Description: Starts and stops aria2 RPC services.
    ### END INIT INFO
    #VAR
    RUN="/usr/bin/aria2c"
    ARIA_PID=$(ps -ef | grep 'aria2c --daemon' | grep -v grep | awk ' {print $2}')
    # Carry out specific functions when asked to by the system
    case "$1" in
    start)
    echo "Starting script aria2c "
    if [ -z "$ARIA_PID" ]; then
    $RUN --daemon=true --enable-rpc=true -D --conf-path=/mnt/hd/aria2/config/aria2.conf
    echo "Started"
    else
    echo "aria2c already started"
    fi
    ;;
    stop)
    echo "Stopping script aria2c"
    if [ ! -z "$ARIA_PID" ]; then
    kill $ARIA_PID
    fi
    echo "OK"
    ;;
    restart)
    echo "Restarting script aria2c"
    if [ ! -z "$ARIA_PID" ]; then
    kill $ARIA_PID
    fi
    sleep 3 # TODO:Maybe need to be adjust
    $RUN --daemon=true --enable-rpc=true -D --conf-path=/mnt/hd/aria2/config/aria2.conf
    echo "OK"
    ;;
    status)
    if [ ! -z "$ARIA_PID" ]; then
    echo "The aria2c is running with PID = "$ARIA_PID
    else
    echo "No process found for aria2c RPC"
    fi
    ;;
    *)
    echo "Usage: /etc/init.d/aria2c {start|stop|restart|status}"
    exit 1
    ;;
    esac
    exit 0
    #########################################
  2. 监控脚本
    这里写一个监控脚本,定时执行监控aria2是否是运行状态,如果不是,就启动aria2。

1
/home/pi/monitor/aria2c_monitor.sh

脚本的内容如下:

1
2
3
4
5
6
7
8
9
10
11
#!/bin/bash
time=`date "+%Y-%m-%d %H:%M:%S"`
exec="/mnt/hd/aria2/start_aria2c.sh start" #this is your exe file
sda1=`ls -al /mnt/hd | grep aria2 | grep -v "grep"`
aria2=`ps -ef | grep "/mnt/hd/aria2" | grep -v "grep" | awk -F \ {'print $2'}`
if [[ $sda1 != "" && $aria2 == "" ]]
then
echo '['$time']' 'aria2 starting' >> /home/pi/monitor/logs/aria2_monitor.log
$exec
echo '['$time']' 'aria2 started' >> /home/pi/monitor/logs/aria2_monitor.log
fi
  1. 定时执行
1
2
3
vi /etc/crontab 
###添加如下内容到crontab
*/30 * * * * root /home/pi/monitor/aria2c_monitor.sh

使用webui

aria2有多种第三方的管理界面,方便添加下载任务和删除下载任务,并实时查看下载任务情况。如AriaNg,webui。AriaNg界面比webui要漂亮,功能也相对丰富点。但这里选用webui,原因是webui界面比较简单直观,二来因为webui在添加下载任务时,可以通过在下载地址最后面添加–out=xxx 来指定下载后的文件名,特别是下载百度云的文件时经常被命名为一些很奇怪的名字,关于这个AriaNg没找到相关指定文件名的方法。

  1. 下载webui

webui是静态页面,下载下来直接用nginx或者apache解释即可:

1
2
mkdir /mnt/hd/aria2/web-ui
sudo git clone https://github.com/ziahamza/webui-aria2.git /mnt/hd/aria2/web-ui
  1. 配置nginx

这里假定系统已经安装完成了nginx,nginx的安装过程不作介绍。如果不懂,可以从网上找安装nginx的相关资料。
编辑nginx的配置文件(nginx.conf),添加如下内容:

1
2
3
4
5
6
server {
listen 81;
server_name aria2.gogl.top 127.0.0.1;
index index.html;
root /mnt/hd/aria2/web-ui/;
}

配置完之后重启nginx

1
2
3
4
nginx -t   
###先校验修改后的nginx配置文件有没有问题,
###如果显示success,再执行下面重新加载配置
nginx -s reload

重新加载nginx配置文件成功后,打开浏览器,访问http://127.0.0.1:81,就可以看到webui:
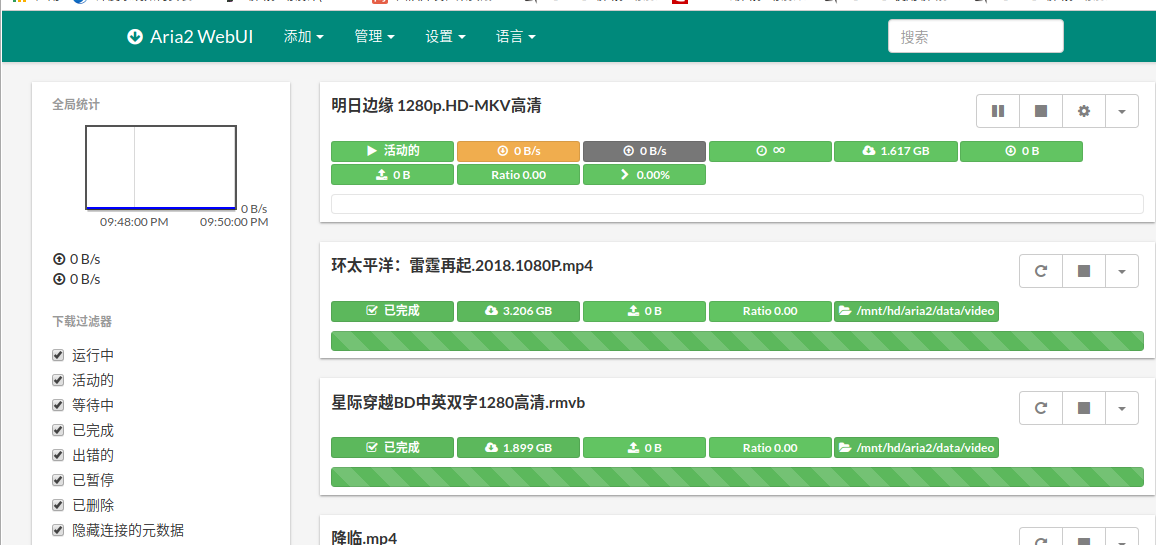
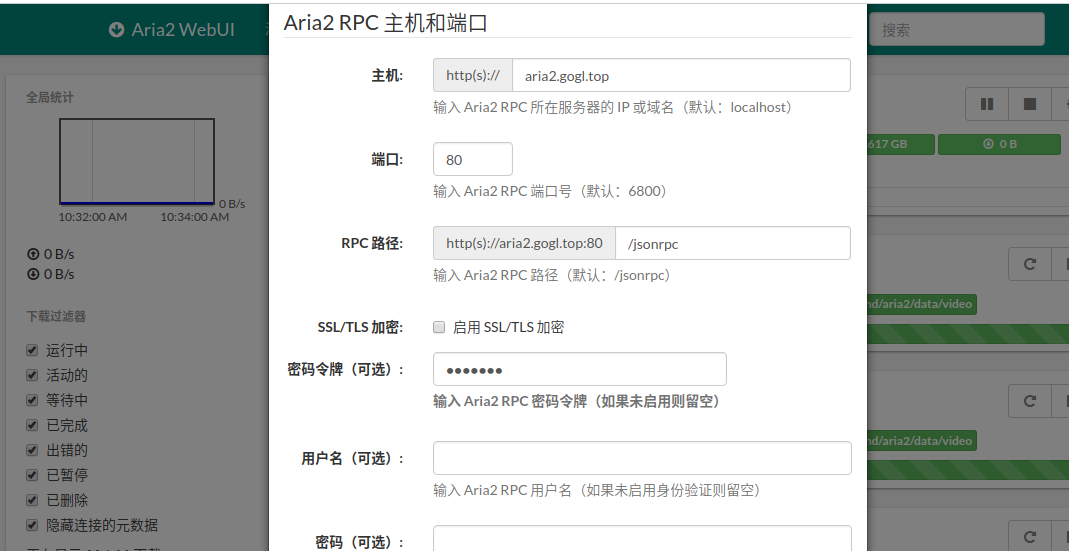
aria2

  1. 设置aria2 rpc

在webui的”设置”–>”连接设置”,设置主机和端口,还有密码令牌。
端口由aria2的配置文件(aria2.config)的rpc-listen-port参数指定,默认是6800。密码令牌是由rpc-secret指定。
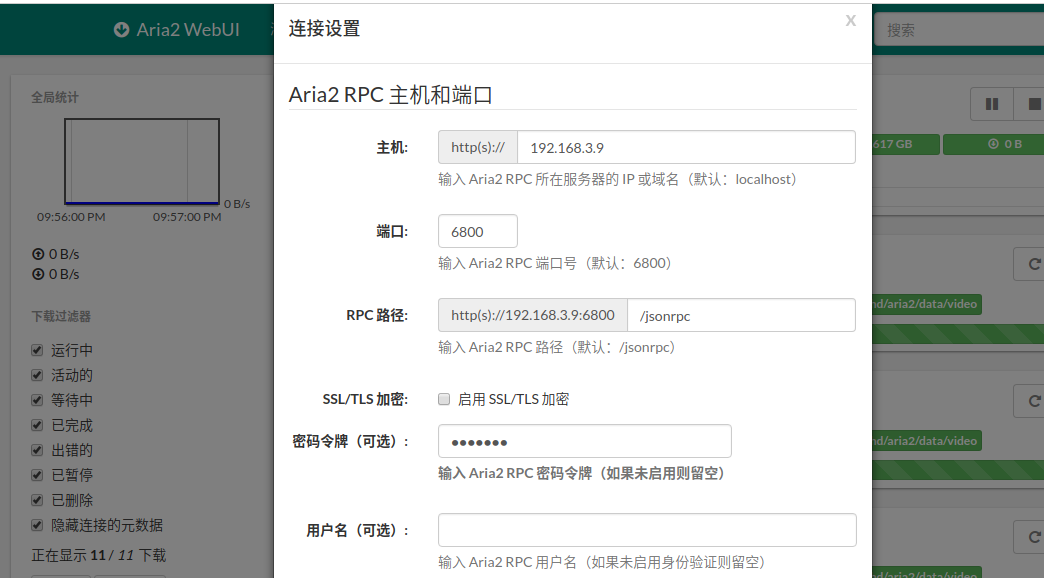
aria2_rpc

将aria2映射到外网

通常我们会将树莓派部署在家里,在家庭网没有外网ip的情况下,就无法在外网随时随地访问我们的aria2下载我们想要下载的资源。这里我们介绍将家里的aria2服务映射到外网。
用于外网映射的工具有ngrok,frp等,首先我们需要有一台外网服务器,网上也有很多免费提供映射的服务,如 FRP外网穿透。这里使用FRP来穿透内网的aria2到外网,由于这里是介绍aria2,所以不详细介绍FRP的使用。更多内容,请看FRP外网穿透 或者 FRP官方

  1. 配置外网FRP服务端(frps.ini)
1
2
3
4
5
6
7
8
9
10
11
12
13
14
15
16
17
18
19
20
21
22
23
24
25
26
27
28
29
30
[common]
bind_addr = 0.0.0.0
bind_port = 5000
log_file = ./logs/frps.log
log_level = debug
log_max_days = 2
vhost_http_port = 5001
vhost_https_port = 5002
dashboard_port = 5003
dashboard_user = admin
dashboard_pwd = xxxxxxx
privilege_mode = false
privilege_allow_ports = 8000-9999
max_pool_count = 30
authentication_timeout = 100

[762278915]
type = http
auth_token = 111111 ##令牌在客户端连接时需要使用
bind_addr = 0.0.0.0
listen_port = 8009
custom_domains = aria2.gogl.top

[237314465]
type = http
auth_token = 111111
bind_addr = 0.0.0.0
listen_port = 8010
custom_domains = aria2.gogl.top
locations = /jsonrpc

这里使用了aria2.gogl.top域名,如果没有域名,可以不配置aria2.gogl.top
2. 配置内网树莓派FRP客户端服务(frpc.ini)

1
2
3
4
5
6
7
8
9
10
11
12
13
14
15
16
[common]
server_addr = xxx.xxx.xxx ##服务端ip
server_port = 5000 ##服务端ip
log_level = error
log_file = /mnt/hd/frpc/logs/frpc.log
auth_token = 111111 ##服务商设置的令牌

[762278915] ##762278915对应服务端
type = http
local_ip = 127.0.0.1
local_port = 81 #树莓派nginx端口(代理webui)

[237314465] ##237314465对应服务端
type = http
local_ip = 127.0.0.1
local_port = 6800 ##aria2 rpc端口

如果没有自己没有域名,打开浏览器,访问 http://外网服务商ip:5001 就可以,然后根据上一节的”3. 设置aria2 rpc”来设置主机为外网服务器ip地址,端口为5001。注意,这里端口是5001,不是8009,也不是8010。

  1. 使用域名

如果自己有域名,可以在域名设置将域名指向外网服务商的ip,如这里将aria2.gogl.top指向外网服务器ip,端口为80。在外网服务器安装nginx,添加以下nginx配置:

1
2
3
4
5
6
7
8
9
10
11
12
13
14
15
16
17
18
19
20
21
server {
listen 80;
server_name aria2.gogl.top;
root /usr/local/nginx/html;
location / {
proxy_pass http://127.0.0.1:5001;
proxy_redirect off;
proxy_set_header X-Real-IP $remote_addr;
proxy_set_header X-Forwarded-For $proxy_add_x_forwarded_for;
proxy_set_header Host $host;
client_max_body_size 10m;
client_body_buffer_size 128k;
proxy_connect_timeout 90;
proxy_send_timeout 90;
proxy_read_timeout 90;
proxy_buffer_size 4k;
proxy_buffers 4 32k;
proxy_busy_buffers_size 64k;
proxy_temp_file_write_size 64k;
}
}

proxy_pass 代码到5001端口。打开浏览器,访问http://aria2.gogl.top,再设置rpc的主机为aria2.gogl.top,端口为80,如:
aria2_rpc